NOTE: This page only describes how I installed MY alarm. This is not an official
install guide. The wiring scheme used on motorcycles can vary between model years and even from one country
to another during the same model year. If you try any of the information provided here, you do so at your
own risk as a simple mistake can instantly destroy a $1,000.00 ECM module. Furthermore, a poor
installation such as a wire shorting out against the frame has the potential to cause an accident
due to sudden loss of power. If you're reasonably mechanically inclined you can install an alarm system in a
few hours. If you don't know how to read a schematic, use a soldering gun or operate a volt meter, do yourself
a favor and have a smart friend or your local dealer install the system for you.
LFF Security Corporation Security Systems Model LM 508
After searching for an alarm system for my Hayabusa, I decided on the LM 508.
This system has every feature you can possibly want and can be purchased on Ebay for about
$80.00 shipped!
There is another system on the market that is nearly identical to the LM 508 except it has a $139 price tag.
The third system I considered was the Scorpio, however after adding all the extras it runs 4X the price of the LM 508
and the tiny built in Piezo siren is not impressive.
Contents of the LM 508 kit
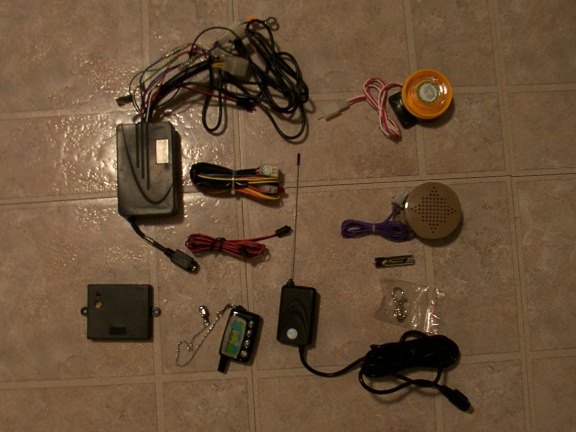
This is a 2 Way Paging alarm system. If anyone sets off the alarm the included backlit pager
will play a melody and vibrate to warn you of trouble. At the same time a loud voice informs
the intruder that the bike is protected by an alarm followed by all the turn signals flashing and the incredibly
loud siren that will make your ears bleed.
The pager controls all the functions of the alarm such as silent arm, shock sensor only
or shock plus microwave perimeter sensor, locate, panic, anti-hijack etc.
When armed with the microwave perimeter sensor, anyone walking within a few feet of the bike will be verbally
warned to stay away from the bike along with a few chirps of the siren.
Whenever the alarm is triggered the ignition system is locked out and the bike cannot be started. If someone
hijacks the bike all you have to do is hit the arm button as they are riding off and in 5 seconds the
the siren and lights activate and the bike automatically shuts down.
The alarm is also capable of remote starting which has to be the most stupid idea ever conceived
for a motorcycle. I guess if you're a bling type squid this might be a selling point.
There are only a few minor things I don't like about this alarm system:
The manual is written in a rare form of English known as "ALL YOUR BASE ARE BELONG TO US". There are several
pages that go into detail on how to use all the features and it's accurate as long as you can decipher the
"Chinglish". The installation instructions are non-existent except for a wiring schematic on the last page.
The schematic is accurate and easy to follow but that's all you get.
The pager is nice and compact but the melody it plays when paging you could be louder. On the plus side it
does vibrate so it should get your attention if you're in a noisy environment.
My biggest gripe is the speech feature. I swear it sounds like a Chinese woman trying to pull off
a British accent. When someone walks near the bike it says "Don't touch, the motorcycle
is protected by an alarm".
When you turn the bike off it always reminds you to set the alarm followed by several loud
siren chirps. As mentioned before, the siren is loud and it may not be welcome in certain locations...especially at night.
What's incredibly annoying is the melody it plays when you start the bike followed by some speech that I haven't
quite figured out yet. It sounds like "We're ready to hit the road" but according to the Chinglish manual it says
"Hello, let's go, may you happy all the way!".
Fortunately the speaker is separate from the siren and you can just leave it out. There is also an easy way to do away with the alarm reminder and music while still keeping the verbal warning
which I'll describe later.
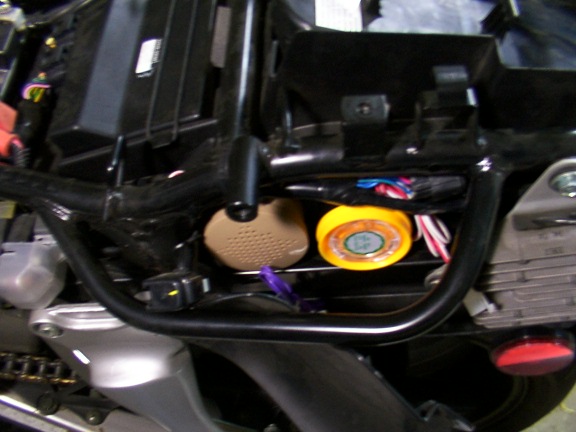
I chose to keep the system completely out of the way and hidden so that I didn't have to give up any trunk space.
Once the tail section is off, there is plenty of room to start test fitting the components. Left side by the grab
bar was perfect for speaker and siren. All components have very strong double sided foam tape attached to allow easy
mounting.
This is where I installed the antennae making sure that it didn't contact the frame. There is a lot of cable that
can't be cut but at least there's plenty of empty space in the bottom of the tray to bundle it up.
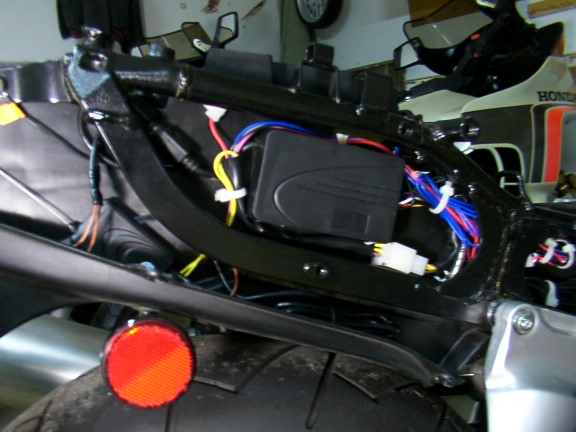
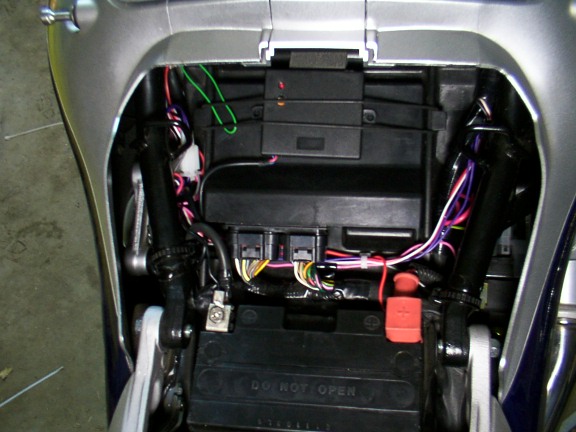
This is the brain of the system mounted just to the right of the antennae. I ran the yellow and brown wires to the
back and the rest around the front. There's plenty of wire provided so you won't run short and any extra can be cut
or bundled up. On the far left of the picture you can see a yellow tag, that's where I attached the black chasis ground wire.
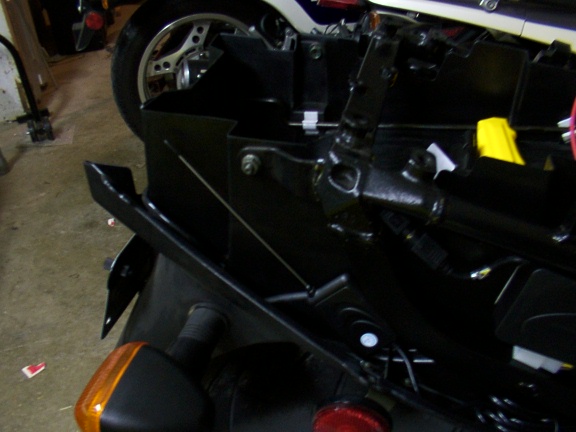
At the end of installation I mounted the red fuse with double sided tape as far up as possible. With
the tail section back on I can still get to it if needed.
Ignition Disable
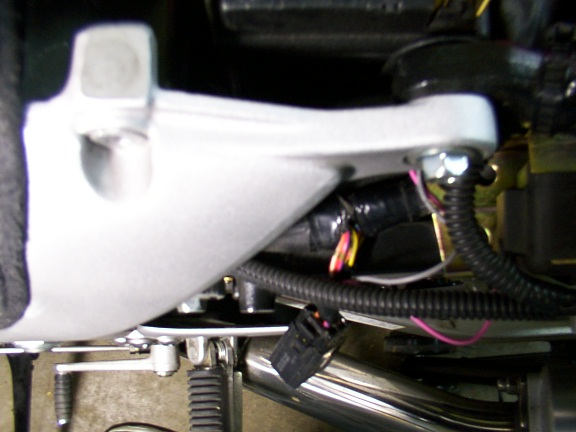
This is the one and only cut that I made for the ignition disable. This is a small relay on the left side of the bike
with 4 wires going to it. I chose the thin yellow with black tracer wire since it carries very little current. I cut
this wire and attached the alarm's pink wire to one side and the alarm's gray wire to the other. Connections were SOLDERED
and then DOUBLE HEAT SHRINKED. When the alarm is triggered the fuel pump relay will not engage and the bike will not start.
If the bike is hijacked, I can hit the arm button and the bike instantly shuts down, the FI light comes on and the bike
simply can't be restarted until the alarm is disabled.
I ran the pink and gray wires near the battery and under the ECU harness where they are somewhat accessible. If the alarm
should ever fail in a major way I could easily bypass that connection on the side of the road.
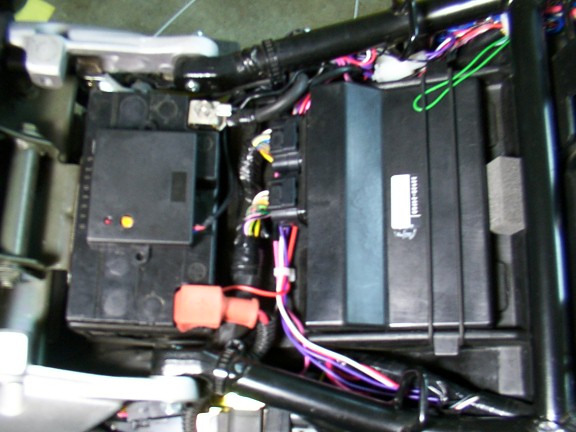
Notice the placement of the GREEN loop of wire. I brought this out so that it's easily accessible. If the shock sensor is
too sensitive you can cut this wire to decrease sensitivity by a about 1/3.
NOTE: The perimeter sensor is just laying on the battery for now...DO NOT MOUNT IT THERE!
Yellow wires are for your turn signal flashers. I didn't get any pictures of this part but it's self explanatory. One
yellow wire splices into the left turn signal hot lead and the other yellow wire splices into the right turn signal hot lead.
YOU NEED TO FIND YOUR HOT WIRES WITH A VOLT METER! The colors vary according to the bikes year. Attach the black lead of your meter
to a metal portion of the bike and the red lead to one of the signal leads. Set the meter to DC and the proper range.
With the turn signals turned on for that direction, you'll see 12 volts appear and
disappear when you're on the hot lead. If you're on the ground lead you'll see nothing.
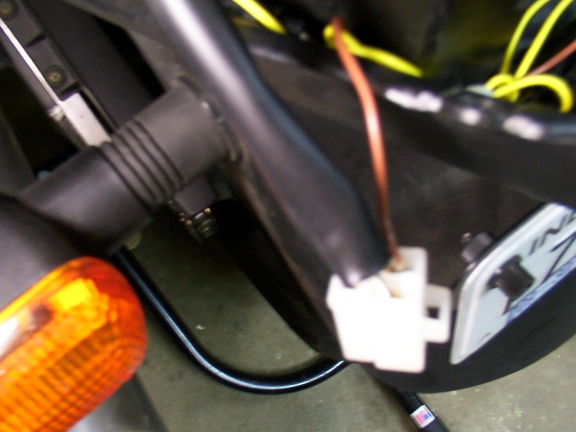
At the rear of the bike you'll see the disconnect plugs. I unhooked the plugs for room to work and then pulled back the
protective wire covering to expose the wires. For the left side I used an exacto knife to remove about 5/16" of insulation
from the hot wire and then soldered the yellow wire to it.
I wrapped it in electrical tape and then put a small zip tie over the tape, pulled the protective cover back up and snapped
the plug back together. Right side was done the same way.
Plastic electrical splice connectors would probably work fine but I personally don't trust anything that is not soldered. Also
whenever electrical tape is used I secure it with zip ties because eventually the tape will loosen up and fall off.
The brown wire from the alarm needs to go to a circuit that's hot only when the ignition key is in the ON position. If you're going
to use the remote start feature it must go to the accessory circuit off your ignition cylinder.
Since I have no use for the electric start I used the tail light as it's easily accessible and always powered when the key is on.
Three wires go into the plug, the brown one provides the power to the tail light on my bike. Instead of cutting anything I just unlatched the
female spade connector from the plug. When looking at the plug from the front, there's a small notch you can put a paper clip in
and the spade connector will unlatch. Once out I soldered the alarm's brown wire to it and then snapped it back into place.
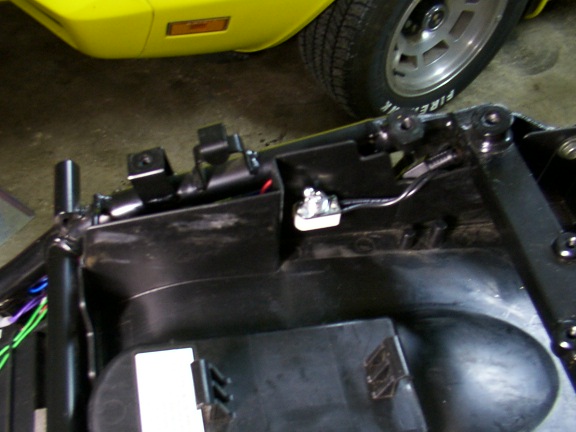
This is how to get rid of the annoying music and speech.
I cut the alarm's brown wire that I installed previously and soldered it to the leads of this toggle switch and heat shrinked
the connections. I attached the switch inside the trunk area with foam tape. With the switch in the OFF position every feature
of the alarm still works, but it doesn't know when the bike is turned ON or OFF therefore no more reminders to arm the alarm and no loud reminder chirps. If the speaker is hooked up, the speech WILL still work for when someone triggers the alarm.
The brown alarm wire could have just been left disconnected, however if the pager needs to be recoded or if you want to add
a second pager you need to turn the ignition switch on/off 8 times. The brown wire needs to be hooked up for this to work and now
it's just a simple matter of flipping the switch.
There's also a cool thing you can do with that brown wire...take another wire off from the hot side of that switch and bring it
back to your underseat compartment for later use. That brown wire works with the remote start function, when you press and hold
the backlight button on your pager for 3 seconds, it activates the remote start sequence. That brown ignition wire is energized
continuously for ignition (there are other leads that energize for about 1 second for the starter). If you have something like LED
accent lights, you can now turn them on and off with the pager! Keep in mind that if the hidden switch is ON your tail light will
also light up and eventually drain the battery.
This is where I chose to mount the perimeter sensor with a few pieces of foam tape. It's not exactly flat but it works great
with the sensitivity turned up a bit. I have it set so that if I walk within 3' of the bike the alarm will be triggered.
Only other place is on top of the battery which is a bad idea as even a sealed battery will vent small amounts of corrosive
fumes which can destroy the electronics inside the sensor overtime. There is also a block of rubber on the bottom of the seat that
is used to secure the battery, if you mount the sensor there you'll have to remove that block of rubber and your battery will be
free to bounce around.
Lastly I soldered lugs on the red and black wires and attached them to battery terminals.
Only item I didn't use from the kit was the flashing LED as there's no good place to mount it without having to drill a hole.
So far everything works just as it should. I haven't tested the maximum range yet but with the bike inside my garage the pager
communicates no problem from the edge of my property which is about 500' away.
ANOTHER BIT OF ADVICE. ADD A HIDDEN MASTER ON/OFF INSIDE YOUR TRUNK. JUST BREAK THE RED FUSED POWER WIRE. EVEN WHEN THE SYSTEM IS UNARMED IT'S STILL MONITORING FOR FEEDBACK FROM THE REMOTE PAGER WHICH MEANS SMALL POWER DRAIN ON YOUR BATTERY. IF THE BIKE SITS FOR A FEW WEEKS UNARMED, THE BATTERY WILL BE DRAINED.
If you have any questions, feel free to email me at vairxpert@hotmail.com